Symmetry in Motion
Reflection
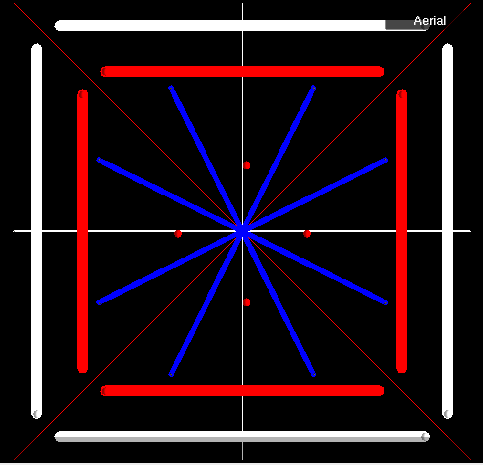
For the first few weeks of this project, Ms. Xaysanapannha had us download and play with Star Logo to learn how it works. We learned how to use the different codes, make shapes, and create designs. We split into small groups and found how to make shapes like circles, squares, pentagons, octagons, half circles, etc. and shared them with the class. Over the next few weeks, Ms. X provided codes for us to make an x-y axis and then put different agents in different quadrants. For my final product (below) I began by using the codes that Ms. X provided to make my axes. Our final products had to include reflection, translation, and rotation. I made spheres that spin around in circles that reflect each other. If you look at the screenshot, the white lines are spheres translating back and forth and the red lines are other spheres translating. The blue lines are agents that extend from the (0,0) point on the axis and walk back and forth. Each of the spheres and agents are reflected, whether it is across the x or y axis. Fairly simple, each agent has a procedure they are told to do that continues forever. For example, the only code for the spheres on the red line is "move forward 60 steps, turn left 180 degrees (repeat)". The codes are very simple and easy to make because they are all logical procedures.
One habit of a mathematician that I used during this project is number one, 'Look For Patterns'. All of this project revolved around patterns, reflection, translation, etc. I had to look for the patterns within each agent's code and learn what I needed to do to reflect their movement. I think that one thing that went well in this project was that by the end, I understood (for the most part) how to use Star Logo to create art and patterns. One thing that didn't go well was the fact that for most of this project, Star Logo made no sense to me. Ms. X gave us the codes and I just copied them, so when the time came for me to make my own codes, I had no idea what to do. However, with the help of peers and using my own logic, I was able to figure out what I needed to do to create the design I wanted.
Below is the file for my final StarLogo design:
| kaleidoscopefinal_may.sltng |
